Signmax Transfer Cut Guidelines
Please follow these guidelines when creating your custom transfer-cut stickers or decals. This will help to ensure that we can accommodate your transfer decal project.
|
Transfer Cut Guidelines:
- Simple and open fonts are recommended.
- All text must be at least 1/2" tall.
- The space between characters and other design elements must be at least 1/8”.
- Main strokes, line weights, or art elements should be a minimum of 1/8”
- Minimum pick size of 1/8”.
- We recommend you request a proof for this product.
Picks are areas of the letters or graphics that will be pulled out after cutting. Additional costs are applied to orders over 8 standard picks with a maximum of 40 picks per sq. foot.
|

|
Disclaimers:
- Transfer cut price includes 8 standard picks with a Maximum of 40 picks per sq. foot.
- Additional picks are $0.02 to $0.04 per pick depending on difficulty/intricacy.
- Intricately cut decals will be custom quoted based on difficulty and time required to pick.
Application as Easy as 1, 2, 3!
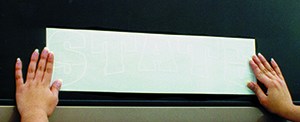
| 1. |
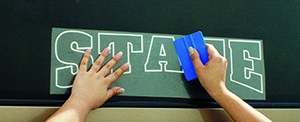
2. |
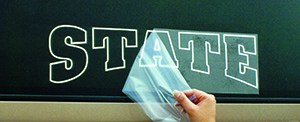
3. |
 |
 |
 |
| Clean surface thoroughly. Carefully remove paper backing, leaving the vinyl on the transfer tape. Place decals on intended surface. |
Using a plastic squeegee or credit card, start in the center of design and firmly apply design to surface using overlapping strokes. |
Carefully begin to remove transfer tape to expose product. If bubbles occur, simply prick the bubble with a needle and smooth. |
Note: Best results when applied between 60o – 80o F. Do not apply in direct sunlight. Wait a few days for adhesive to fully cure before washing.
If you have any questions, please contact a customer service representative at 320-846-9000 or email [email protected]